ps2 repair - September 09, 2024


For over 12-15 years, my PS2 has been in storage at various places I've lived. It has survived a flooded garage, hot attics, a house that I once lived in oppressive heat in with no A/C and as of last night, I fixed it. Here's what I learned.

Before you start, let me warn you that capacitors hold a charge near the power supply. Even if it hasn't been unplugged for years, you do not want to be messing with any charged capacitors. Secondly, never ever plug it in and turn it on when it is open. In order to avoid doing that, you'll need to eject the tray before opening it and then push it in until it looks kind of like this: tray

☝️ You can take the front cover off, but in hindsight, it wasn't worth it and I did end up breaking off a piece of plastic that I can never reattach. Luckily, I got it to go back on okay and stay. If you ask me, I did this for no reason and the top will come right off without removing this piece.

Next, turn it off, not half way like this... Then cut the warranty sticker. They probably won't honor it anymore anyhow. switch

Then flip it over and start removing the pads and screw covers. Mine was already missing one, so I was way ahead of the curve. bottom

When you're done, you should have screws separated like this: screws

From what I've read, later models didn't have the reset and eject buttons ribboned and attached to the lid like this. Lucky me! I have a first gen. If you suspect yours has this, lift the lid very carefully. Here's why: ribbon

Cool, the lid is off, but it's gross. Go scrub that with some dish soap. It won't hurt anything unless you don't let it dry. That's one reason I see why I had to remove the button assembly from the lid. top

Also, I don't use air duster cans. I bought this awesome air gun on Amazon for $25 and it's worth it. Just don't get carried away and blow all of the delicate screws you just removed from you PS2 off the table like I did. Spoiler, the story ends with me finding them all and closing up the PS2. air gun

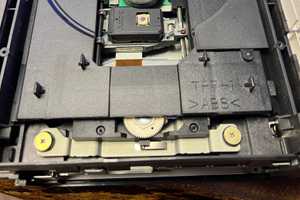
Next, you're going to see the disc drive. You're going to remove the top, so there are 4 screws to remove: disc tray screws

They'll look like this, so if you dust the tray out, don't blow them away. Yes I blew these off table too. tiny screws

This next part is exactly why the first step is to eject the tray, not only do you not want a disc in it, but it's not a good idea to work on electronics that are plugged in. Anyway, this is the big moment. The reason you've done all of this. Take a q-tip and soak one end in 91% isopropyl alcohol. Not enough to run down into the disc drive, but enough to clean the laser lense. Once you've carefully cleaned the lense, use the other end to dry it off. open disc tray

Finally, let's do everything in reverse order.

  • replace the top of the disc drive
  • replace the tray cover
  • carefully shut the tray
  • if necessary, reattach the ribboned button assembly to the lid
  • replace the lid
  • replace and tighten all of the screws.
    ⚠️ Don't forget where the longer and shorter screws go! ⚠️
  • replace the pads and screw covers

Finally, the moment of truth. Did mine work? Yes. It immediately read the disc and all other formats and I hope that if you discover this because you're thinking about repairing a PS2, it's a helpful guide. Happy tinkering. ps2 boot